Monday, March 27, 2017

Arnold for Maya 2016


 First things first: getting it to work. Arnold cost money (unfortunately), but you can get a 15-day trial to try things out. It automatically installs the plugin for you.

Inside Maya, you need to go into your plugin manager and check the "mtoa.mll" plugin. Then, set Arnold as your default renderer in the render settings.


Okay, so the Arnold rendering tool is actually pretty awesome.

For one thing, it actually has different filters you can try out inside the render view. All you have to do is select the experimental option in the Arnold tab.

And then you get stuff like this:

Filter on lighting only 
Render based on your triangles; also known as the Crystal Tower


A filter for the different pieces of your object

My original tower, for comparison


There is also an in-program render for arnold itself, which automatically updates based on your camera. You can select just single parts to render, move the camera around (and not have to click on the render button), and even select certain objects inside the renderer itself!
you can move around and it will still render for you, which is really cool

 Arnold works with ray tracing and sampling, but also includes things like color correction for linear workflow.

the "sampling" tab just tells you how many rays will be bouncing around - the more there are, the more detailed things get, but also the longer the render time


 Arnold works really well with TX image files, which translate well for color correction. The converter from regular diffuse/spec/bump maps to TX files is under the utilities section in the Arnold tab. It's called the "tx manager".


Lighting in Arnold is very much like the systems already in place by Maya, but ten times better (though ten times dimmer from my personal experience).

Instead of intensity, Arnold has something called "exposure", which is essentially the same thing.
A major thing Arnold adds to the lighting is something called "AI Volume Scattering (which is accessed in the Arnold tab of the rendering preferences).

It adds in foggy effects for lights and is generally amazing (though it kills the processor).
LOOK HOW AWESOME THIS LOOKS
As seen above, you can also make meshes lights themselves. You just select the mesh and transform it into a light.

just select the mesh_light option under arnold translator

Area Lights in Arnold can now be changed into circles and cylinders, and have "shutter" effects if you want to use those.

There are photometric lights that imitate the values of artificial lights. They use IES files for their values.

There is a skylight that surrounds the scene and essentially imitates light from the sky, but unfortunately does not come with a background image.

For that, you use the AIphysical skylight. You just select an image and it does light based off of that.


from there you can also add smog, change the color of the lighting (at your own risk), and even change the position of the sun!


The materials of Maya are, to my knowledge, almost the same as Maya's, albiet with different names for the values. Like the lambert material for Maya, Arnold uses a material called AIStandardMaterial.

Matte makes an object one, flat color
Diffuse is for texturing
Extended Controls changes what parts of the object can be touched by light, and which turn into a black void
The section for Spec in Arnold is used for reflectivity, where weight is how detailed the reflections are, roughness is how blurry they are, and antisotropy tells you  in which direction does the light flow on the surface of the polygons.

To make a material transparent, you select the object and uncheck "opaque".
Then you edit the Spec and refractions of the object.

Refractions are good for simulating light bouncing inside of a mirror.


Arnold also has a special shader for hair and skin, which allows for the user to change the color of the tips and roots of the hair, as well as the glossiness of each strand.


For skin, Arnold goes into a little more depth (literally).

I made everything skin just because
With Arnold's skin shader, one can edit the multiple levels of skin, and how light will bounce between it all. This comes in sections of "shallow, middle, and deep". For texturing, Arnold, once again, prefers TX files.


Arnold also comes with a series of special effects that can be applied to scenes. Unlike the others, special effects are applied specifically through the camera settings.


Vignettes can be added through the filter map, either as transparent files or actual gradient materials.

Depth of field is something that can be played with through the values.
Focus distance tells you where the camera should focus.
Aperture Size is the size of the reflections.
Aperture blades are the shape of the reflections.
Curvature is how they should curve, etc.

look at that blur
The settings can also be changed through the depth of field tab (arnold is just more precise).

With materials, you can create an AI Ambient Occlusion and apply it to objects.


Okay to be quite honest I'm still not so sure how this one works.
I know that:
Spread is how blurry the shadows get
Falloff is how far the shadows go
Near Clip is how much of the "close" shadows are rendered
Far Clip is how much of the "far" shadows are rendered.


Do you want God Rays in your scene? Well with AIVolumeScattering you can do that! Under the environment tab of the Arnold Render Settings you can create an instance of AIVolumeScattering.

Unfortunately it is only compatible with point, area, and spotlights.

Under the AIVolumeScattering options are things like attenuation, samples, and antisotropy.

Attenuation is how far the light rays go
Samples determines how noisy things will be
Antisotropy works to scatter the rays


There is also a feature called AOV (arbitrary output variables), which is only available in the rendering view of Arnold. It basically changes how the final render will look. To activate it you just go to the render settings and enable the AOV in the AOV tab. AOV rendering serves a similar purpose to debugging a render, and specific render nodes can be made in the render settings.

You can also do batch renders for AOV (aka making separate render images for different modes). Just go to the render settings, select the common tab, create an AOV output folder in the exr format,right click, and select render pass.

Batch render it in the Render tab. Then you can open it up in photoshop to edit the separate layers/rendering formats.


From what I learned, Arnold isa really awesome and versatile rendering program. If it didn't cost money (and didn't take forever to render on my laptop, I'd be using it regularly.

Monday, February 27, 2017

WatchTower Project

For this project, I was tasked with creating both a high and low poly model for a watchtower from Age of Empires. The low poly model also had to be textured and baked. The low-poly model had a maximum limit of 1,200 polys. The high-poly model had a minimum limit of 12,000 polys.

I chose to recreate on of the Indian watchtowers.

The process to create it was simple. Create a cube, extrude, edit the edges/vertices, repeat.

For the parts that needed to be symmetrical (such as the walls with windows, I just created one side, and, when done with it, duplicated it, rotated it 90 degrees, merged the vertices of the two wall corners, and then repeated the process to create the main structure.

I focused on the low-poly model first since it was the base for the whole project. Conserving the amount of polygons I needed to use was difficult, and I had to sacrifice modeling out a few details here and there as a sacrifice.

In the end I ended up with this:

with only 1186 polys

The high-poly model was a matter of dividing faces, insetting those faces that needed to be bricks (or boards in the watchtower's upper floor) , and then extruding those faces. Other features were simpler to make, since buildings are very geometric and angular.

the high-poly model at almost 70,000 polygons


I didn't worry too much about overlapping faces here and there, since this model was going to be used mainly for baking.
After finishing the high-poly model, I went into unwrapping. This was one of the more difficult things to do. Even though it was low-poly, the windows (and figuring how to unwrap them properly), gave me the most trouble. 

After many hours, I settled with using the cylindrical wrapping for them and the other walls. It seemed to work at first, at least until I realized that Maya hates overlapping UVs during the baking process.

In the end I just separated them and used the unfold tool:


Unwrapping this was a long process of relearning what I had forgotten from the pluralsight tutorials.

Later, I would find out that keeping different meshes separate allowed for UV overlapping in the texture maps. When I found that out, I separated the model into 3 groups: the roof, the midsection, and the bottom.

Baking was a whole different story. I followed the procedures I learned from making the well and the treasure chest, but corruption after corruption kept occuring within the texture files.

As it turns out, Maya REALLY hates overlapping UVs.

Also, in order for the texture to appear properly on meshes, you need to convert the object's normals into soft edges. I'm not sure why this is, but it's what Maya wants.

Baking took up most of my time, and, until I discovered the two thing above, I almost gave up on it. It wasn't until the early hours of Monday morning that I figured everything out.

the strange corruption for the bottom piece. this was solved by making all normals soft edged.
the better normal map after fixing it

Though some texture corruption still occured during baking, the results were far better (and any mistake can be fixed in photoshop)
The strange original corruption of the upper balcony's normal maps
the newer one, having been edited in photoshop

With UV mapping and baking done, it was time to create the diffuse files! 

As I mentioned earlier, I found it easier to separate different parts of the model. Thus, different diffuse maps were made for all the models:
the bottom and middle sections
upper floor
the roof.


Creating the roof was both easy and extremely fun to do!


In the end, this is what I made:


And here are some renders in Maya


aaaand here are some of the ambient and specular textures as well, to show that I did use them:

ambient for the roof. the errors were fixed in photoshop

ambient for the front entrance
ambient for middle section

the spec for the bottom portion. Since it's mostly bricks, most of the model is not shiny.

Monday, February 13, 2017

Baking A Pistol

The process of baking is not the hardest thing to do. The most time consuming thing about it is waiting for the actual textures to bake. Once again, I chose the 3Ds Max tutorial as modeling out the well seemed to cover that aspect of Maya pretty well.
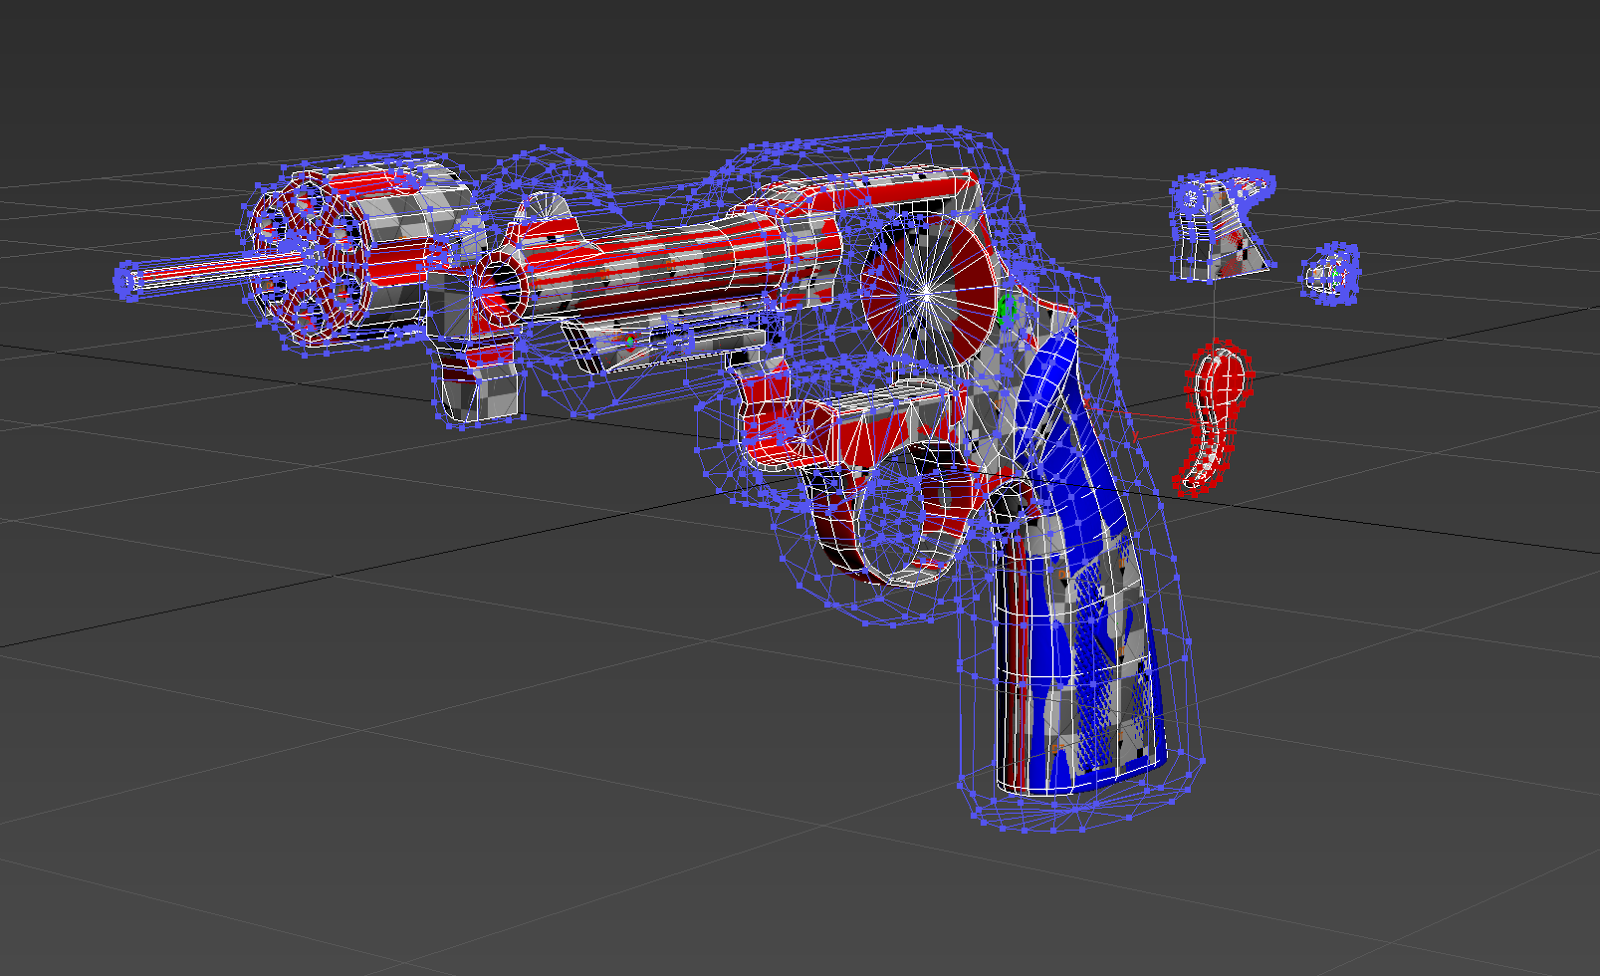
the original model, with checkered textures and a simple animation that separates the different pieces

The first step is to color-code the high poly model. All you need to do here is create new materials that are different colors, and apply them to the selected polys/parts.

like this
It's easier to use the soft select the different pieces (like the bolts) when assigning the materials.

After that comes grouping the high and low poly models into their own groups and then selecting the low-poly group, pressing the ATTACH button in the toolbar to the right, and selecting the low-poly options.


Then, with the low poly group selected, you press 0 to open the render option toolbar:


From there you  assign the renderer to the LP_group (scanline) in the render settings and under the Renderer options select Hammersling for global supersampling.

You can add or delete what type of maps you want to make under the output list (diff, normal maps, ambient occlusion, etc).


Under projection mapping you go and select all the high poly objects.


A bounding box will appear. You can edit it under the "projection" modifier of the object. Make sure it is larger than the actual models.

After that you select the image settings you want for the group and then press bake.

And then you wait.

tah-dah!
With ambient occlusion, you create a global lighting object in the scene and repeat the process:

which will give you something like this for the low poly model

For whatever reason, when switching to ambient occlusion, my renderer settings refused to acknowledge that the low poly group existed anymore:


I couldn't find a fix for this, so I had to switch to the tutorial instructor's sample model instead. It worked from there. Aside from that small hiccup, everything went smoothly.


The process for baking in 3Ds Max is very similar to that of Maya, though Max feels a bit faster (though that could be the model in Max being lower-poly than Maya's well), and it's really cool to see the texture being baked onscreen instead of just a simple loading bar.

I feel like I could easily switch between Max and Maya when it comes to baking.

UV Unwrapping a Raptor

For the UV unwrapping tutorial, I decided to choose 3Ds Max since I felt comfortable with the process in Maya. After going through the videos, I learned that UV unwrapping in 3Ds Max is actually more automatic and easier than it is in Maya.

The process of unwrapping in Max is simple: you can choose from various different perspectives, such as planar, cylindrical, box, or spherical.

Inside the UV editor are tools that you can use. In this tutorial, the stitching tool was your best friend. It allowed you to select edges/seams and connect them with other UVs.

your best friend (along with the relax tool)

For the first step (unwrapping the tail), a cylindicral perspective was used.


With cylindrical unwrapping, a rounded object's UVs are spread out in a line, and are separated by a seam. For the tail, the bottom was used as the seam, since it is less visible.

After that, pressing the "relax" button in the UV editor was all that was needed to make it presentable.

After the tail came the body, which was slightly more complex. For the body, you had to select the loops around the neck and limbs (as well as one at the very bottom), and create the seams artificially (which was done by simply pressing a 'create seams' button in the UV unwrapping panel).

the blue lines are the seams
after that, you just peeled the UV with the peel mode button:

this is also where you create the seams
Though, unlike with what happened in the tutorial, my bottom seam was not as neat as the instuctor's:


I'm not sure why this happened, but it can be easily fixed within the UV editor by manually manipulating the UV vertices/edges. I would experience this problem with the other parts of my model's body, unfortunately.

The process for unwrapping the legs, feet, claws, arms, neck, and even head were very similar.
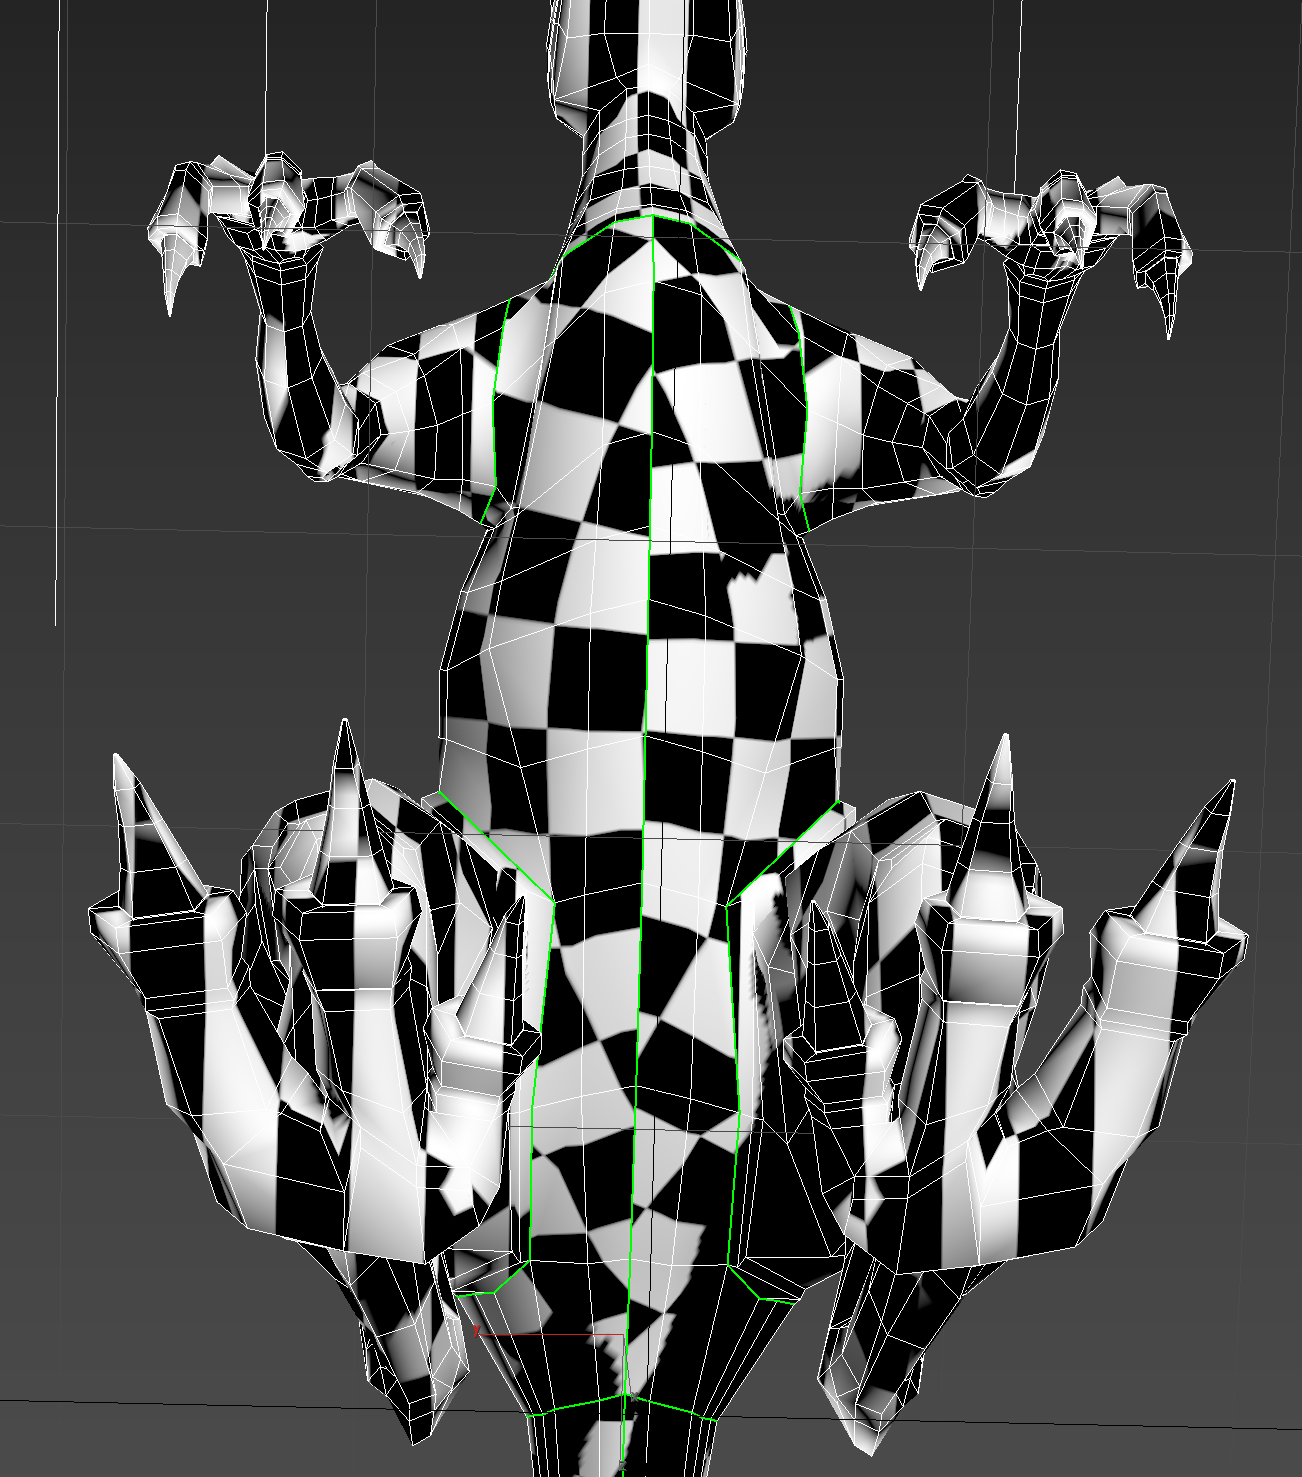
The peel tool was used for both the arms and the legs.
the arms before being peeled

the arms' UVs after being peeled. They were stitched and relaxed after this
The process had additional steps though, such as the fact that the peeling of the legs and arms around their seams separated some UV faces. This was fixed by manually stitching and merging them back together.
the legs after being stitched together and relaxed
But for the most part, the program did the unwrapping for me, which was nice.


The neck was a simple matter of creating a seam down the middle, selecting one side, and doing planar projection to unwrap it. The two sides were then joined together through the stitching method.

The face, eyes, and tongue were done in the exact same way.

The feet and hands were slightly more challenging to do, but they worked in essentially the same way as the neck and head. Instead of using box selection though to select only one side, you had to select all the faces manually, and then planar projected them.

When you were done, you should have had something looking like this:


All that is left to do is to resize all the UVs and fit them together in the UV map, which is something that I have already been taught to do in the Maya well tutorial.

In all honesty, I prefer 3Ds Max for unwrapping over Maya. As I said earlier, the program does most of the work for you, which is far different than Maya. It's automatic, easy to use, and, if there are any errors, easily fixed.